

Are you an agency? Scale your team's work and impact with The Agency Package.
Are you an agency? Scale your team's work and impact with The Agency Package.
Rulers and guides are among the most important features for a designer. Properly positioning your elements on your canvas can make the difference between a basic design and a neat, professional one.
They help you align your elements as you wish, with pixel-perfect precision, so they are among the most effective ways to design visually accurate banners.
If you struggle with getting your elements aligned or correctly placing your texts and images to maximize your designs impact, this new feature is for you!
We’re proud to introduce the ruler and guides, now available in The Brief.
Stick with us to find out how to use the new feature in The Brief, what’s the importance of the ruler and guides, how to snap your elements to the grids and what are the best practices in the design industry.
You’ll be able to use our new feature like a pro in no time, and make your designs stand out and convert!
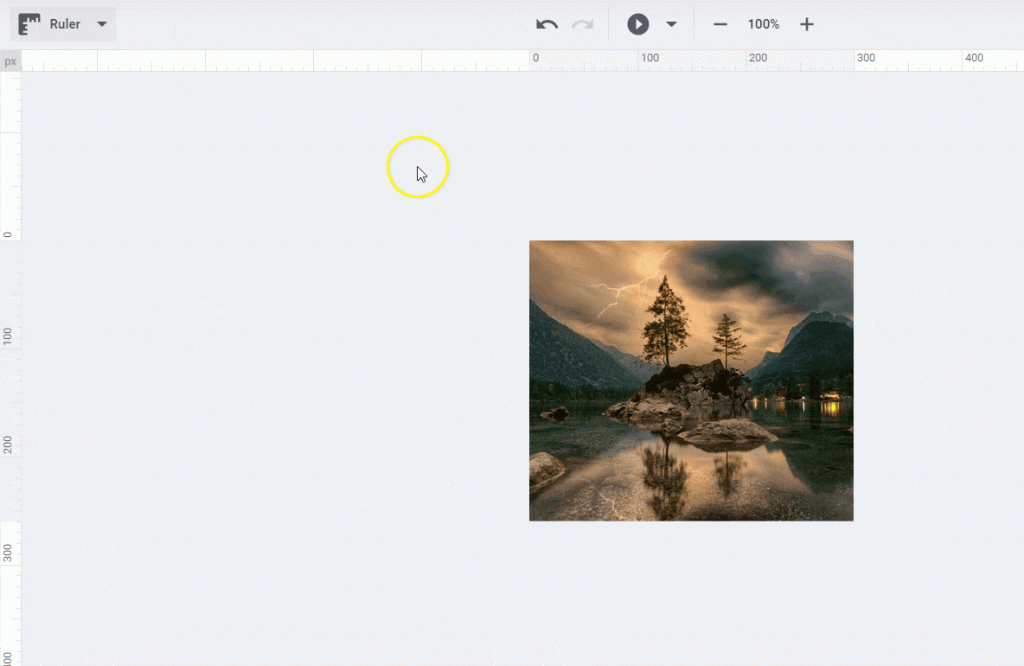
The ruler works just like its name suggests, helping you measure your canvas and place your grids.
Once you log in and open your design, you’ll find the ruler button on the top-right corner. Turn it on by clicking it, and you’ll see the horizontal and vertical rulers in pixels. This way, you’ll be able to measure your work with pixel perfect precision and use it to set your guides at the desired places.
The guides are simple design markers that help you align your elements. If you are a pro designer using The Brief, you’ve already been expecting this feature, and you sure know how to use it. But if you are using guides for the first time, here are some best practices and tips to guide you.
So, let’s proceed and see a detailed step by step guide on how to use the guides in The Brief.
Adding a guide is as simple as a drag and drop move. Once you decided what guides you need to make your design stand out, you can proceed to add yours. To add a guide to your layout in The Brief, merely open the ruler and drag a guide to your document wherever you need it. Use the ruler to measure where you need to place your grids according to what you need in your design.
You can move your guides anywhere you need with pixel perfect precision, just by selecting and dragging them until you reach the desired numerical value on the ruler.
To remove your guides, use the delete option or just drag & drop them to the exterior of your design.
If you only want to hide them to see a preview of your design and you need to use your guides again later, use the hide ruler option. Don’t worry, if you use this option, your guides are not lost, you can just turn the ruler on again to find them.
The snapping option is one of the best parts of this feature! With its aid, you can align objects with a simple drag and drop; when an element of your choice gets close to one of your guides, it sticks to it like iron to a magnet. Once aligned to the grid, your object will pop into place and stick to it.
After the object aligns to one of your guides, you have the option to move it along that line to snap it into place with other guides, too. If you don’t want an object aligned with a specific guide, just keep moving it to let go of the guide as soon as you walk it far enough
With the new guides, it’s never been easier to create photo collages or to distribute your canvas into equal parts and align your images.
To create a photo collage, all you have to do is put your grids in place at the same distance from the margins and each other, then align your photos to make them stick to the guides.
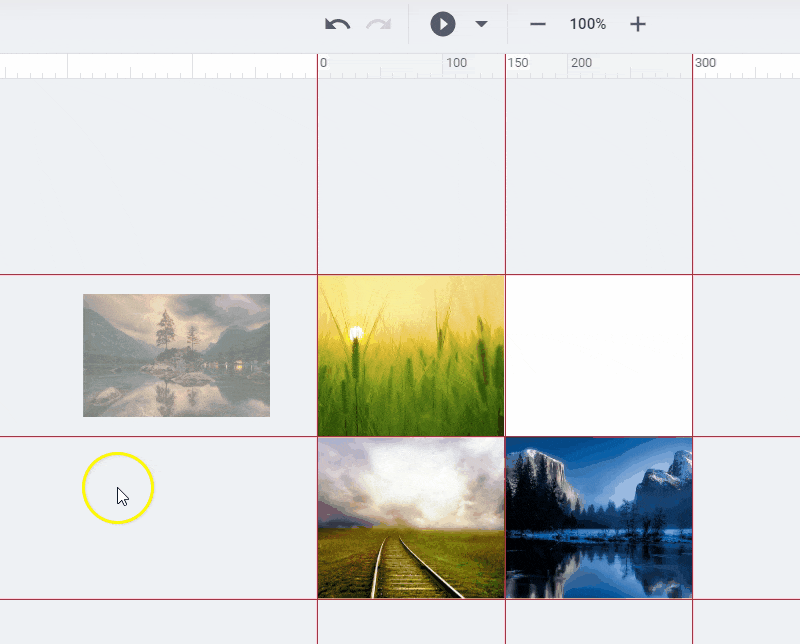
The same rules apply to whenever you need to divide your canvas to make your design pop. For example, you can easily create a banner that contains a ⅓ image and ⅔ text. Then mark the center of your text area to find a place to add the call to action button.
If you are in the design world, you must know there are some best practices to help you use the guides most efficiently. But if you're new to this, check this out, we listed some of the most important ones to help you get started.
As you can see, rulers and guides have numerous options and can make your life a whole lot easier when it comes to design.
Use our The Brief feature for more accurate placement and design like a pro!
7 days free on us
Let's put these insights into action. Build, scale, and automate campaigns with AI-powered workflows.